Connecting remote IoT devices securely using P2P SSH on a Raspberry Pi with a free server setup is a powerful way to manage and monitor your devices from anywhere in the world. With the rise of IoT devices in homes and businesses, ensuring secure communication between devices and networks has become more critical than ever. This article will guide you step-by-step on how to set up a secure connection using SSH, Raspberry Pi, and a free server, allowing you to manage your IoT devices remotely without compromising security.
Remote IoT management is no longer just a convenience but a necessity for tech-savvy individuals and businesses alike. By leveraging the power of SSH (Secure Shell), you can create a peer-to-peer (P2P) connection that ensures data is encrypted and protected from unauthorized access. This setup is particularly useful for managing IoT devices such as smart home systems, environmental sensors, and industrial automation tools.
In this comprehensive guide, we'll explore everything you need to know about securely connecting remote IoT devices using a Raspberry Pi and SSH. From setting up the hardware and software to configuring the server and securing your connection, we'll cover all the essential steps to help you achieve a robust and reliable remote management system. Let's dive in!
Table of Contents
- Introduction to IoT SSH Connection
- Raspberry Pi Setup for Remote IoT
- How to Secure SSH Connection
- Free Server Options for IoT
- Setting Up P2P Connection
- Troubleshooting Common Issues
- Ensuring Data Security in IoT
- Performance Tips for Remote IoT
- Best Practices for Secure IoT Management
- Conclusion
Introduction to IoT SSH Connection
IoT devices are revolutionizing the way we interact with technology, but they also introduce new challenges in terms of security and connectivity. SSH, or Secure Shell, is a protocol that provides secure communication over an unsecured network. By using SSH, you can remotely connect to your IoT devices and manage them securely.
SSH is particularly useful for IoT devices because it encrypts all data transmitted between the client and server. This ensures that even if someone intercepts the communication, they won't be able to decipher the data without the proper encryption keys. Additionally, SSH supports authentication methods such as password-based and public-key authentication, adding another layer of security to your setup.
Why Use SSH for IoT Devices?
Here are some reasons why SSH is a preferred choice for securing IoT connections:
- Encryption: SSH encrypts all data, ensuring secure communication.
- Authentication: Supports multiple authentication methods for added security.
- Portability: Works across various platforms and devices.
- Reliability: SSH has been a trusted protocol for decades.
Raspberry Pi Setup for Remote IoT
The Raspberry Pi is a versatile and affordable single-board computer that is perfect for IoT projects. Setting up your Raspberry Pi for remote IoT management involves a few key steps, including installing the operating system, configuring network settings, and enabling SSH.
Before you begin, ensure you have the following:
- Raspberry Pi (any model with sufficient processing power)
- MicroSD card (8GB or larger)
- Power supply
- Network connection (Wi-Fi or Ethernet)
Step-by-Step Raspberry Pi Setup
- Install the Operating System: Download Raspberry Pi OS from the official website and use a tool like BalenaEtcher to flash it onto your microSD card.
- Enable SSH: Create an empty file named "ssh" in the boot directory of the microSD card to enable SSH by default.
- Connect to the Network: Configure Wi-Fi or Ethernet settings in the "wpa_supplicant.conf" file on the boot partition.
- Boot the Raspberry Pi: Insert the microSD card, connect the power supply, and let the Raspberry Pi boot up.
How to Secure SSH Connection
Securing your SSH connection is crucial to protecting your IoT devices from unauthorized access. By default, SSH provides a basic level of security, but additional measures can be taken to enhance its protection.
Here are some best practices for securing your SSH connection:
- Use Public-Key Authentication: Disable password-based authentication and use public-key authentication for added security.
- Change Default SSH Port: Change the default SSH port (22) to a non-standard port to reduce the risk of brute-force attacks.
- Limit SSH Access: Use firewall rules to restrict SSH access to specific IP addresses or networks.
- Regularly Update Software: Keep your Raspberry Pi and SSH software up-to-date to protect against vulnerabilities.
Configuring Public-Key Authentication
Public-key authentication is a secure method of authenticating SSH connections without using passwords. Here's how to set it up:
- Generate a key pair on your local machine using the command:
ssh-keygen. - Copy the public key to your Raspberry Pi using the command:
ssh-copy-id user@raspberrypi. - Edit the SSH configuration file (
/etc/ssh/sshd_config) to disable password authentication and restart the SSH service.
Free Server Options for IoT
When setting up a remote IoT management system, you'll need a server to act as the intermediary between your devices and the internet. Fortunately, there are several free server options available that can be used for this purpose.
Popular free server options for IoT include:
- ngrok: A popular tool for creating secure tunnels to local servers, allowing remote access.
- LocalTunnel: Another tunneling service that provides a quick and easy way to expose local servers to the internet.
- Cloudflare Tunnel: Offers a secure and scalable solution for exposing internal services to the internet.
Setting Up ngrok for Remote Access
ngrok is a simple yet powerful tool for creating secure tunnels to local servers. Here's how to set it up:
- Download and install ngrok from the official website.
- Sign up for a free account and authenticate ngrok using the command:
ngrok authtoken. - Run the command
ngrok tcp 22to create a secure tunnel for SSH access.
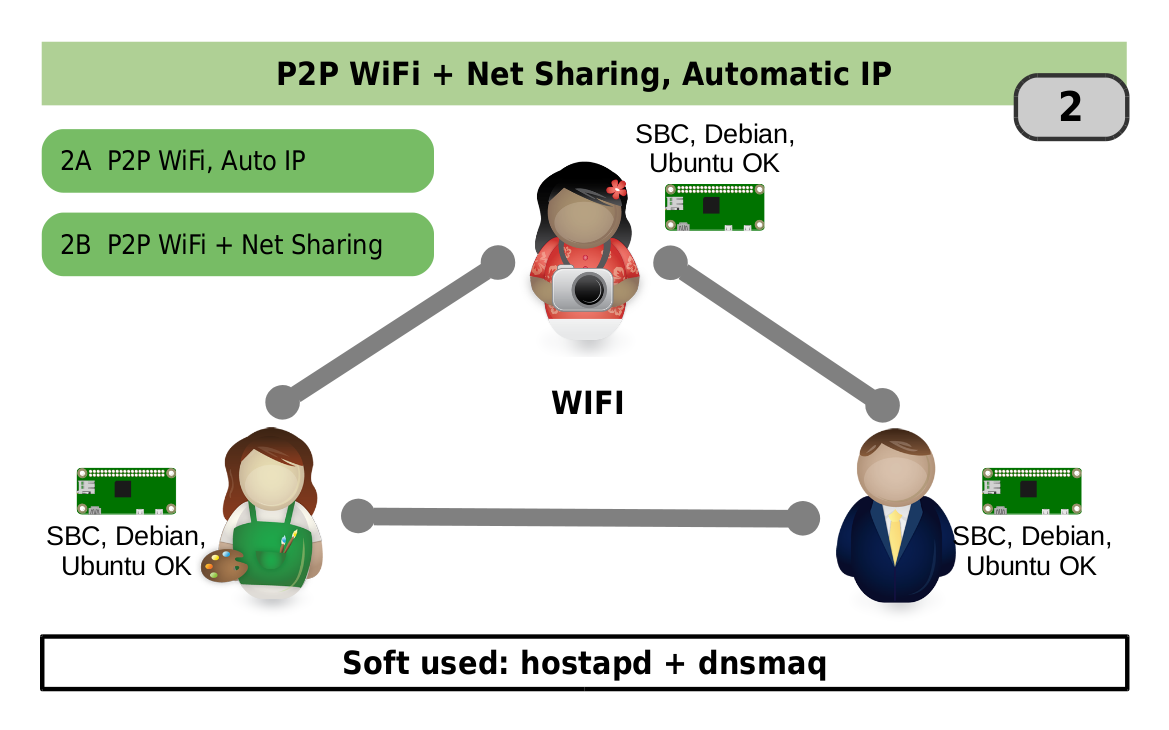
Setting Up P2P Connection
A peer-to-peer (P2P) connection allows your IoT devices to communicate directly with each other without relying on a centralized server. This can significantly reduce latency and improve performance, especially for time-sensitive applications.
To set up a P2P connection using SSH:
- Ensure both devices are on the same network or have access to the internet.
- Configure SSH keys on both devices for secure authentication.
- Use tools like SSH reverse tunneling to establish a direct connection between devices.
Using SSH Reverse Tunneling
SSH reverse tunneling allows you to connect to a device behind a firewall or NAT. Here's how to set it up:
- On the remote device, run the command:
ssh -R 2222:localhost:22 user@server. - From the local device, connect to the remote device using:
ssh -p 2222 user@localhost.
Troubleshooting Common Issues
Even with careful setup, issues can arise when configuring remote IoT connections. Here are some common problems and their solutions:
- SSH Connection Refused: Ensure the SSH service is running and the correct port is being used.
- Authentication Failed: Double-check your SSH keys and ensure they are correctly configured.
- Network Connectivity Issues: Verify network settings and ensure both devices are connected to the internet.
Ensuring Data Security in IoT
Data security is a top priority when managing IoT devices remotely. By implementing robust security measures, you can protect sensitive data and ensure the integrity of your IoT system.
Key strategies for ensuring data security include:
- Encryption: Use strong encryption protocols for all data transmissions.
- Access Control: Implement strict access controls to limit who can access your devices.
- Regular Audits: Conduct regular security audits to identify and address vulnerabilities.
Performance Tips for Remote IoT
Optimizing the performance of your remote IoT setup can improve reliability and reduce latency. Here are some tips to enhance performance:
- Use Compression: Enable SSH compression to reduce data transfer times.
- Optimize Network Settings: Configure your network for optimal performance, especially for time-sensitive applications.
- Monitor Resource Usage: Regularly monitor CPU, memory, and disk usage to ensure your Raspberry Pi is operating efficiently.
Best Practices for Secure IoT Management
To ensure a secure and reliable remote IoT management system, follow these best practices:
- Regular Updates: Keep all software and firmware up-to-date to protect against vulnerabilities.
- Backup Data: Regularly back up important data to prevent loss in case of hardware failure.
- Document Procedures: Maintain detailed documentation of your setup and configuration for easy reference.
Conclusion
Securing remote IoT connections using P2P SSH on a Raspberry Pi with a free server setup is a powerful way to manage and monitor your devices from anywhere in the world. By following the steps outlined in this guide, you can create a robust and secure system that protects your data and ensures reliable communication.
Remember to implement best practices for security and performance, and regularly update your setup to protect against emerging threats. If you have any questions or feedback, feel free to leave a comment below or share this article with others who may find it useful.