Setting up a remote IoT web SSH server on Windows 10 has become an essential skill for modern IT professionals and enthusiasts alike. As the Internet of Things (IoT) continues to grow, more devices are being connected to networks, making it crucial to manage and secure them remotely. This guide will walk you through the entire process, ensuring that you have a robust and secure setup.
Whether you're managing home automation systems, monitoring industrial sensors, or controlling remote devices, having a reliable remote access solution is indispensable. By leveraging SSH (Secure Shell), you can securely connect to your IoT devices from anywhere, as long as you have an internet connection.
This article is designed for both beginners and advanced users who want to understand the nuances of setting up a remote IoT web SSH server on Windows 10. We’ll cover everything from the basics to advanced configurations, ensuring that you have all the tools and knowledge to succeed.
Table of Contents
- Introduction to Remote IoT Web SSH
- Understanding SSH Server on Windows 10
- Preparing Your Windows 10 System
- Enabling SSH Server on Windows 10
- Configuring Remote Access
- Securing Your SSH Server
- Connecting to Remote IoT Devices
- Troubleshooting Common Issues
- Best Practices for Remote SSH
- Conclusion and Next Steps
Introduction to Remote IoT Web SSH
In today's interconnected world, IoT devices are everywhere, from smart homes to industrial automation systems. Managing these devices remotely is not only convenient but also necessary for maintaining operational efficiency. A remote IoT web SSH server allows you to securely access and manage your IoT devices from anywhere, using a Windows 10 machine as the central hub.
SSH, or Secure Shell, is a cryptographic network protocol that provides a secure way to access remote devices. By setting up an SSH server on your Windows 10 system, you can establish a secure connection to your IoT devices, ensuring that your data remains protected from unauthorized access.
While the concept of SSH might seem intimidating at first, this guide will break it down into manageable steps, ensuring that even beginners can successfully set up and manage their remote IoT web SSH server.
Understanding SSH Server on Windows 10
Windows 10 includes a built-in SSH server feature that can be easily enabled and configured. This feature allows you to create a secure connection between your Windows machine and other devices on your network, including IoT devices.
Key Benefits of Using SSH on Windows 10:
- Secure data transfer through encryption
- Remote command execution
- Support for multiple authentication methods
- Integration with Windows security features
Understanding the architecture of the SSH server on Windows 10 is crucial for troubleshooting and optimizing its performance. The server uses the OpenSSH protocol, which is widely regarded as one of the most secure methods for remote access.
How SSH Works on Windows 10
SSH operates on a client-server model. The server component listens for incoming connections and authenticates clients before granting access. Once authenticated, the client can execute commands, transfer files, or manage the server remotely.
Preparing Your Windows 10 System
Before setting up your remote IoT web SSH server, you need to ensure that your Windows 10 system is properly prepared. This includes updating your operating system, configuring network settings, and securing your environment.
Steps to Prepare Your System:
- Update Windows 10 to the latest version
- Install all necessary drivers and firmware
- Configure your firewall settings to allow SSH traffic
- Set up a static IP address for your Windows machine
By following these steps, you ensure that your system is optimized for remote access and secure communication.
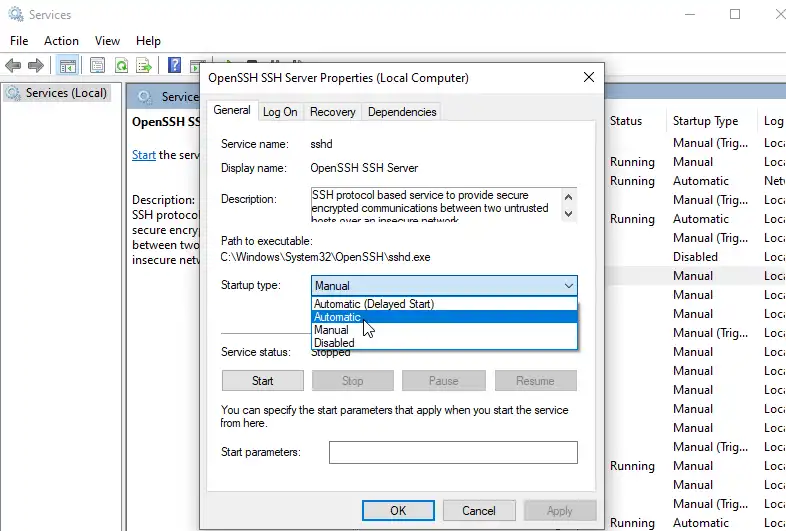
Enabling SSH Server on Windows 10
Enabling the SSH server on Windows 10 is a straightforward process. Follow these steps to activate the feature:
- Open the Windows Settings app
- Navigate to "Apps"> "Optional Features"
- Click on "Add a feature" and search for "OpenSSH Server"
- Select "OpenSSH Server" and click "Install"
Once installed, the SSH server will be ready to use. You can verify its status by checking the Windows Services Manager.
Configuring Remote Access
After enabling the SSH server, the next step is to configure remote access settings. This involves setting up authentication methods, managing user permissions, and configuring network settings.
Authentication Methods
SSH supports multiple authentication methods, including:
- Password-based authentication
- Public key authentication
- Two-factor authentication
For maximum security, it’s recommended to use public key authentication, which eliminates the need for passwords and reduces the risk of brute-force attacks.
Securing Your SSH Server
Security is a top priority when setting up a remote IoT web SSH server. Follow these best practices to protect your system:
- Use strong passwords or public key authentication
- Disable root login
- Change the default SSH port (22)
- Enable firewall rules to restrict access
- Regularly update your system and software
By implementing these security measures, you can significantly reduce the risk of unauthorized access and ensure the integrity of your data.
Connecting to Remote IoT Devices
Once your SSH server is set up and secured, you can connect to your IoT devices from anywhere. Use an SSH client, such as PuTTY or Windows Terminal, to establish a connection.
Steps to Connect:
- Open your SSH client and enter the server IP address
- Specify the port number (default is 22)
- Enter your username and password or use a private key
- Execute commands or manage files as needed
Connecting to your IoT devices through SSH allows you to perform tasks such as monitoring sensor data, updating firmware, or troubleshooting issues remotely.
Troubleshooting Common Issues
Even with careful preparation, issues can arise when setting up a remote IoT web SSH server. Here are some common problems and their solutions:
- Connection Refused: Ensure that the SSH service is running and the firewall allows SSH traffic.
- Authentication Failed: Verify that your username and password are correct, or check your public key configuration.
- Timeout Errors: Check your network settings and ensure that there are no connectivity issues.
Referencing authoritative sources such as the Microsoft OpenSSH documentation can provide additional guidance for troubleshooting.
Best Practices for Remote SSH
To ensure the long-term success of your remote IoT web SSH server, follow these best practices:
- Regularly back up your data
- Monitor system logs for suspicious activity
- Limit access to authorized users only
- Keep your software and firmware up to date
By adhering to these practices, you can maintain a secure and efficient remote access solution for your IoT devices.
Conclusion and Next Steps
Setting up a remote IoT web SSH server on Windows 10 is a powerful way to manage and secure your IoT devices. By following the steps outlined in this guide, you can create a robust and secure setup that meets your needs.
Key takeaways from this article include:
- Understanding the importance of SSH for remote access
- Enabling and configuring the SSH server on Windows 10
- Implementing security best practices to protect your system
- Connecting to and managing IoT devices remotely
We encourage you to share your experience with setting up a remote IoT web SSH server and leave your feedback in the comments below. Additionally, explore our other articles for more insights into IoT and remote access technologies.