Remote login to Raspberry Pi has become a critical skill for tech enthusiasts, hobbyists, and professionals alike. Whether you're managing a home server, running IoT projects, or automating tasks, being able to access your Raspberry Pi remotely is essential for efficient workflow. This guide will walk you through everything you need to know about remote login to Raspberry Pi, from setup to troubleshooting.
In today's interconnected world, the ability to control devices remotely is no longer a luxury but a necessity. Raspberry Pi, with its versatility and affordability, has become a favorite among developers and hobbyists. Understanding how to set up and maintain a secure remote connection ensures that you can manage your projects efficiently, even when you're miles away.
Whether you're a beginner or an experienced user, this article will provide step-by-step instructions, expert tips, and best practices to help you master remote login to Raspberry Pi. Let's dive in and explore how you can unlock the full potential of your Raspberry Pi.
Table of Contents
- Introduction to Remote Login
- Methods for Remote Login to Raspberry Pi
- Setting Up SSH for Raspberry Pi
- Using VNC for Remote Access
- Ensuring Secure Remote Connections
- Troubleshooting Common Issues
- Tools and Software for Remote Access
- Best Practices for Remote Login
- Applications of Remote Login
- Conclusion and Call to Action
Introduction to Remote Login
Remote login to Raspberry Pi allows users to access and control their Raspberry Pi devices from another computer or mobile device, regardless of location. This capability is particularly useful for managing servers, monitoring IoT devices, or troubleshooting issues without physical access.
There are several methods to achieve remote login, each with its own advantages and use cases. The most common methods include SSH (Secure Shell), VNC (Virtual Network Computing), and third-party tools like TeamViewer. Understanding the differences between these methods is crucial for selecting the right solution for your needs.
Before we delve into the specifics, it's important to note that security should always be a top priority when setting up remote access. This guide will cover best practices to ensure your Raspberry Pi remains secure while allowing remote access.
Methods for Remote Login to Raspberry Pi
SSH: The Preferred Method
SSH (Secure Shell) is the most popular method for remote login to Raspberry Pi. It provides a secure and efficient way to access the command-line interface of your Raspberry Pi from another device. SSH encrypts all data transmitted between devices, making it a reliable choice for remote management.
VNC: For GUI Access
VNC (Virtual Network Computing) is another widely used method for remote login. Unlike SSH, VNC allows users to access the graphical user interface (GUI) of the Raspberry Pi, making it ideal for tasks that require visual interaction.
Both methods have their strengths, and the choice depends on the specific requirements of your project. For example, SSH is perfect for scripting and automation, while VNC is better suited for applications that require a graphical interface.
Setting Up SSH for Raspberry Pi
Setting up SSH for Raspberry Pi is a straightforward process. Follow these steps to enable SSH on your device:
- Ensure your Raspberry Pi is connected to a network.
- Open the terminal on your Raspberry Pi.
- Type the following command to enable SSH:
sudo raspi-config. - Use the arrow keys to navigate to "Interfacing Options" and press Enter.
- Select "SSH" and choose "Yes" to enable it.
- Reboot your Raspberry Pi by typing:
sudo reboot.
Once SSH is enabled, you can connect to your Raspberry Pi from another device using an SSH client. Popular SSH clients include PuTTY for Windows and Terminal for macOS and Linux.
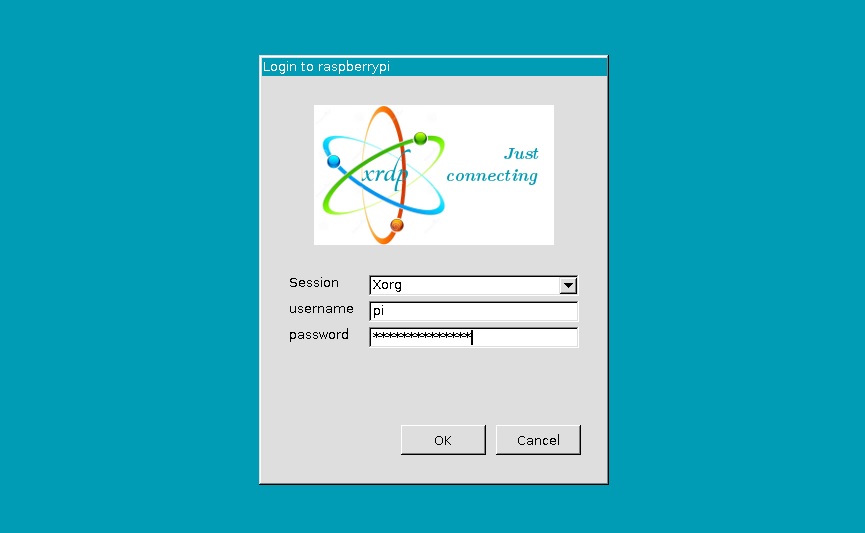
Using VNC for Remote Access
VNC allows you to access the graphical desktop of your Raspberry Pi remotely. Here's how to set it up:
- Install the VNC Server on your Raspberry Pi by running:
sudo apt update && sudo apt install realvnc-vnc-server realvnc-vnc-viewer. - Enable VNC by typing:
sudo raspi-config, navigating to "Interfacing Options," and selecting "VNC." - Download the VNC Viewer application on the device you wish to use for remote access.
- Enter your Raspberry Pi's IP address in the VNC Viewer and log in using your Raspberry Pi credentials.
VNC is particularly useful for applications such as remote monitoring, media streaming, and desktop management.
Ensuring Secure Remote Connections
Security is paramount when setting up remote access to your Raspberry Pi. Follow these tips to ensure your connection remains secure:
- Use Strong Passwords: Avoid using default passwords and opt for strong, unique passwords for your Raspberry Pi.
- Enable Two-Factor Authentication (2FA): Add an extra layer of security by enabling 2FA for SSH connections.
- Update Regularly: Keep your Raspberry Pi's operating system and software up to date to protect against vulnerabilities.
- Use a Firewall: Configure a firewall to restrict access to your Raspberry Pi and only allow trusted IP addresses.
- Change Default Ports: Change the default SSH port (22) to a non-standard port to reduce the risk of brute-force attacks.
Troubleshooting Common Issues
Even with careful setup, issues can arise when attempting to remotely access your Raspberry Pi. Here are some common problems and their solutions:
- Connection Refused: Ensure SSH or VNC is enabled and your Raspberry Pi is connected to the network.
- Incorrect IP Address: Double-check the IP address of your Raspberry Pi and ensure it matches the one entered in the client application.
- Authentication Failed: Verify that you're using the correct username and password for your Raspberry Pi.
- Firewall Blocking: Check your firewall settings to ensure it's not blocking the necessary ports for SSH or VNC.
If the issue persists, consult the official Raspberry Pi documentation or community forums for additional support.
Tools and Software for Remote Access
SSH Clients
Several SSH clients are available for different operating systems:
- Terminal: Pre-installed on macOS and Linux, providing a simple and effective way to access SSH.
- PuTTY: A popular SSH client for Windows users, offering a user-friendly interface.
- WSL (Windows Subsystem for Linux): Allows Windows users to access SSH directly through a Linux terminal environment.
VNC Clients
VNC Viewer is the official client for VNC connections, but alternatives like TightVNC and UltraVNC are also available. These tools provide similar functionality with additional features.
Best Practices for Remote Login
To ensure a smooth and secure remote login experience, follow these best practices:
- Regular Backups: Always keep backups of your Raspberry Pi's data to prevent loss in case of issues.
- Limit Access: Restrict remote access to trusted devices and users only.
- Monitor Activity: Keep an eye on login attempts and monitor any suspicious activity.
- Document Setup: Keep a record of your setup process and configurations for future reference.
Applications of Remote Login
Remote login to Raspberry Pi has a wide range of applications across various fields:
- Home Automation: Control smart home devices and monitor their status remotely.
- Server Management: Manage web servers, file servers, and other services hosted on your Raspberry Pi.
- IoT Projects: Monitor and control IoT devices connected to your Raspberry Pi from anywhere in the world.
- Media Streaming: Access and stream media content stored on your Raspberry Pi remotely.
Conclusion and Call to Action
Remote login to Raspberry Pi is a powerful tool that enhances productivity and flexibility in managing your projects. By following the steps outlined in this guide, you can set up secure and efficient remote access to your Raspberry Pi using SSH or VNC. Remember to prioritize security and adhere to best practices to protect your device and data.
We encourage you to share your experiences and tips in the comments section below. Additionally, explore other articles on our site for more insights into Raspberry Pi and related technologies. Together, let's unlock the full potential of Raspberry Pi and take your projects to the next level!